When you first experience Dolby Atmos, it’s not just sound; it’s an environment. The subtle whisper of rain overhead, a helicopter thrumming directly above you, or a creature scurrying across the ceiling – these aren't just sounds from your front speakers; they’re spatial anchors that root you deep within the onscreen action. But unlocking this transformative 3D audio experience isn't about simply buying the right gear; it’s about mastering your speaker setup. This guide cuts through the complexity, offering practical advice and visual clarity on Dolby Atmos speaker placement diagrams & visual guides to help you optimize your home sound.
At a Glance: Your Dolby Atmos Setup Essentials
- Understanding X.Y.Z: Learn the industry standard for speaker configurations (main, surround, height).
- Key Configurations: Focus on 5.1.2 for beginners and 7.1.4 for a more immersive leap.
- Height is Key: Choose between overhead, up-firing, or dedicated height speakers, each with specific placement needs.
- Room Matters: Room acoustics profoundly impact sound. Consider size, shape, materials, and potential acoustic treatments.
- Calibration is Crucial: Use your AV receiver's auto-calibration tools to fine-tune levels and distances.
- Experimentation Pays Off: Small adjustments can make a big difference in clarity and immersion.
The 3D Soundstage: What is Dolby Atmos, Really?
Imagine sound not just coming from left or right, front or back, but from everywhere—including above you. That's the magic of Dolby Atmos. Unlike traditional surround sound, which is channel-based, Atmos is object-based. This means individual sounds (like a bird, a bullet, or a voice) can be precisely placed and moved anywhere in a 3D space, creating a far more realistic and immersive listening experience.
To achieve this, Atmos adds a crucial vertical dimension to your home theater. This dimension comes from "height" speakers, which project sound downwards or bounce it off your ceiling to create the illusion of overhead audio. Getting these speakers placed correctly is paramount to truly feeling like you're inside the movie, game, or song.
The Blueprint of Immersion: Decoding Dolby Atmos Speaker Configurations
Before diving into exact placement, it's essential to understand the language of Dolby Atmos setups: the X.Y.Z notation. This simple format tells you how many speakers you're working with in each dimension.
- X: The number of traditional "main" and "surround" speakers at ear level. This includes your front left, center, and right, plus any side or rear surrounds.
- Y: The number of subwoofers for low-frequency effects. While one is common, two or more can provide smoother bass response across a room.
- Z: The number of "height" or "overhead" speakers that deliver the crucial vertical dimension of Atmos.
Let's break down the most common and effective configurations.
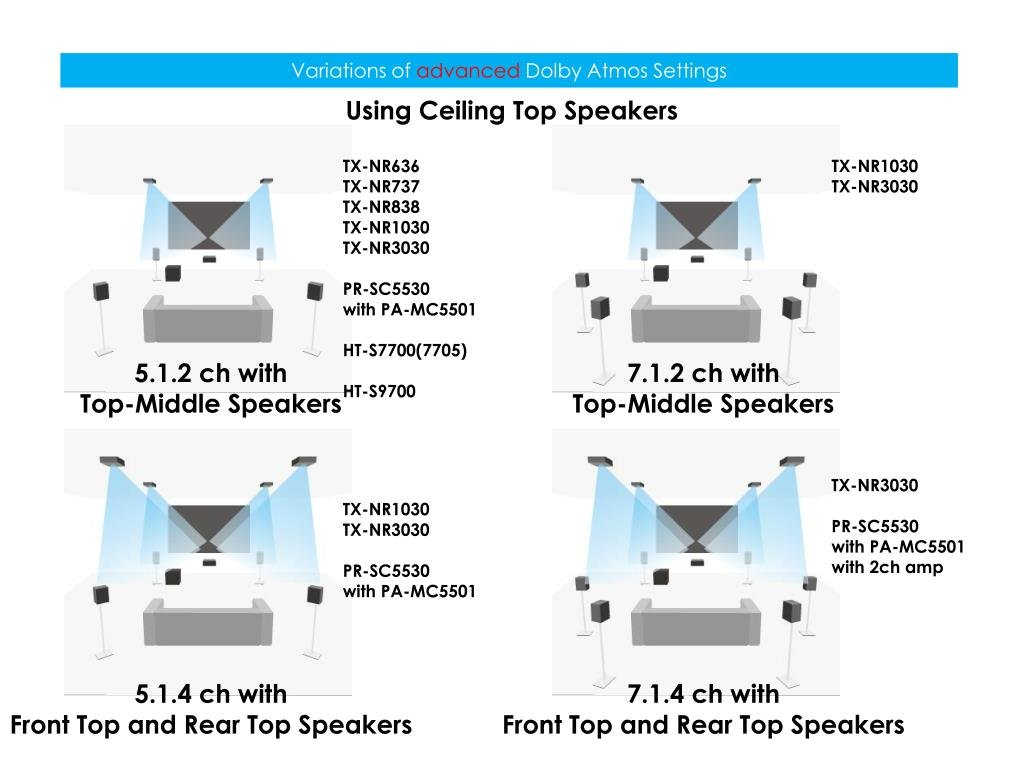
Starting Point: The Essential 5.1.2 Setup
For many, the 5.1.2 configuration is the perfect entry point into the world of Dolby Atmos. It builds upon a standard 5.1 surround sound system by adding two height channels.
- 5 (Ear-Level Speakers): Front Left, Front Right, Center, Surround Left, Surround Right.
- 1 (Subwoofer): A single low-frequency effects channel.
- 2 (Height Speakers): Two overhead or height-enabled speakers.
Visualizing 5.1.2:
Imagine your main listening position (MLP) as the center of a circle. Your front speakers form an arc, the center channel sits directly in front, and your surrounds are to your sides, slightly behind you. The two height speakers are typically placed slightly forward of your MLP, creating a clear overhead soundstage. Aim for symmetry, ensuring equal distance from your MLP to each corresponding speaker.
Diagram Idea: A top-down view of a room with a sofa (MLP), 5 ear-level speakers, and 2 overhead dots, showing ideal angles (e.g., front L/R at 22-30 degrees, surrounds at 90-110 degrees, height overhead).
Stepping Up: The Immersive 7.1.4 Configuration
If you have a larger room or crave an even more enveloping sound, a 7.1.4 setup is your next logical step. This configuration significantly enhances both the horizontal and vertical sound fields.
- 7 (Ear-Level Speakers): Front Left, Front Right, Center, Surround Left, Surround Right, Rear Surround Left, Rear Surround Right.
- 1 (Subwoofer): Still a single subwoofer, though a second can be beneficial.
- 4 (Height Speakers): Four overhead or height-enabled speakers.
Visualizing 7.1.4:
Here, you add rear surround speakers behind your MLP, completing the horizontal sound circle. The addition of two more height speakers (typically front and rear pairs) creates a far more convincing and seamless overhead dome of sound. This allows for smoother transitions of overhead effects, such as a plane flying from the front of the room, directly overhead, and then exiting behind you.
Diagram Idea: Similar to 5.1.2 but with two additional rear surround speakers and four overhead dots, again with angles indicated. The height speakers would ideally be a front pair and a rear pair.
Even Bigger: Considerations for 9.1.6 and Beyond
While 5.1.2 and 7.1.4 cover the vast majority of home setups, more ambitious enthusiasts might consider 9.1.6 or even larger configurations. These systems typically involve:
- Additional Ear-Level Channels: Such as "Front Wide" speakers, positioned between your front L/R and side surrounds, to broaden the front soundstage.
- More Height Channels: Up to six height speakers (e.g., Front, Middle, Rear pairs) for the ultimate overhead accuracy and depth.
These larger setups require more powerful AV receivers capable of processing that many channels and, crucially, a room large enough to properly space out the speakers without causing congestion or awkward reflections. The core principles of symmetry, consistent spacing, and aiming for the MLP remain paramount.
The Vertical Dimension: Mastering Height Speaker Placement
This is where Dolby Atmos truly comes alive. The "Z" in X.Y.Z is critical, and how you achieve that overhead sound makes all the difference. You have three primary methods for implementing height channels:
1. Overhead (In-Ceiling) Speakers: The Gold Standard for Precision
Why they're great: In-ceiling speakers offer the most direct, accurate, and convincing overhead sound. The sound comes from exactly where it's supposed to: the ceiling.
Placement Principles:
- Angle is Key: Aim for a 30-45 degree angle from your main listening position to the speaker. This means they'll likely be slightly forward of your MLP for the front pair, and slightly behind for the rear pair. Avoid placing them directly above or too far forward/back.
- Equidistance: Ensure each height speaker is roughly equidistant from your MLP.
- Symmetry: Maintain symmetry. If you have four overheads, the front left should mirror the front right, and the rear left should mirror the rear right.
- Avoid Walls: Keep them a reasonable distance from walls to prevent unwanted reflections that can muddy the sound.
Diagram Idea: Side view of a room with a listener. A dotted line from the listener's ear to an in-ceiling speaker shows a 45-degree angle. Also, a top-down view showing two or four in-ceiling speakers relative to the MLP, highlighting forward placement.
2. Up-Firing (Dolby Atmos Enabled) Speakers: Leveraging Your Ceiling
Why they're great: If cutting into your ceiling isn't an option, up-firing speakers are a fantastic alternative. These speakers are designed to sit on top of your main floor-standing or bookshelf speakers (or as standalone units) and bounce sound off your ceiling to create the overhead effect.
Placement Principles:
- Clear Path: Ensure an unobstructed path from the up-firing speaker to your ceiling, and then down to your MLP. No ceiling fans, light fixtures, or heavy beams should block this path.
- Ceiling Material: Smooth, flat, reflective ceilings (like drywall) work best. Heavily textured, vaulted, or acoustically treated ceilings will absorb too much sound, diminishing the effect.
- Ceiling Height: Ideal ceiling heights are typically between 7.5 to 12 feet (2.3 to 3.6 meters). Too high, and the sound dissipates; too low, and it sounds too direct.
- Integration: Often placed directly on top of your front left/right and/or rear surround speakers, though dedicated up-firing modules can be placed on stands.
- Avoid Corners: Keep them away from corners or walls that might trap or overly reflect sound in an undesirable way.
Diagram Idea: Side view showing an up-firing speaker on a front L/R speaker, with sound bouncing off the ceiling to the listener. Indicate optimal ceiling height range.
3. Dedicated Height Speakers: A Flexible Elevated Approach
Why they're great: These are traditional bookshelf speakers mounted high on a wall, or placed on tall stands, aimed towards the MLP. They offer a middle-ground between the directness of in-ceiling and the bounce of up-firing speakers.
Placement Principles:
- Elevation: Position them significantly above ear level, ideally at least 2-3 feet (0.6-0.9 meters) above your front speakers, or as high as possible on the wall without touching the ceiling.
- Aiming: Angle them downwards, directly towards your MLP.
- Similar Angles to Overhead: Treat their horizontal placement similar to overhead speakers—slightly forward of your MLP for front heights, and slightly behind for rear heights, maintaining that 30-45 degree angle from the MLP.
- Wall Mounting: Ensure secure mounting and consider using angled brackets to fine-tune their aim.
Diagram Idea: Side view showing a speaker mounted high on a wall, angled down towards the listener. Top-down view showing similar placement to overheads but on walls.
Room by Room: Tailoring Placement for Your Space
No two rooms are identical, and what works perfectly in one might be problematic in another. Your room's unique characteristics—its size, shape, and materials—play a monumental role in how your Dolby Atmos system performs.
Assessing Your Room's Personality: Size, Shape, and Materials
- Room Size:
- Smaller Rooms: Can be more susceptible to bass issues and reflections. Keep speakers slightly closer to the MLP and experiment with toe-in (angling speakers inwards).
- Larger Rooms: Benefit from more powerful speakers and potentially more height channels (e.g., 7.1.4 instead of 5.1.2) to fill the space effectively. Speaker distances will naturally be greater.
- Room Shape:
- Rectangular Rooms: Often ideal, allowing for balanced speaker placement.
- Irregular Shapes (L-shaped, open concept): Can be challenging. Focus heavily on placing main and height speakers relative to the MLP, and use acoustic treatment to mitigate sound leakage or uneven reflections.
- Materials:
- Reflective Surfaces: Hardwood floors, bare walls, glass windows, and metal surfaces will cause sound to bounce excessively, leading to echoes and a "bright" or harsh sound.
- Absorptive Surfaces: Carpets, heavy curtains, upholstered furniture, and bookshelves filled with books help absorb sound, preventing excessive reflections and making the sound clearer and warmer. A good balance of both is key.
Navigating Obstructions and Reflections
The path from your speakers to your ears should be as clear as possible.
- No Physical Blockages: Ensure no large furniture, plants, or decor obstruct the line of sight (and sound) between any speaker and your MLP. This is especially true for up-firing speakers, where even a low-hanging light fixture can disrupt the ceiling bounce.
- Corner Placement: Avoid placing speakers, especially subwoofers or bass-heavy main speakers, directly in room corners unless you're intentionally using corner bass traps. Corners can exaggerate bass frequencies, leading to a boomy, uncontrolled sound.
- Wall Proximity: While speakers often need to be near walls, placing them too close can negatively impact sound. Generally, leave a few inches of space between the back of a speaker and the wall to allow for proper port venting and to prevent bass buildup. For height speakers, avoid placing them right at the wall-ceiling junction.
The Power of Symmetry and Spacing
Symmetry is your best friend in a surround sound setup. Imagine a perfectly balanced sound field, where effects move smoothly and consistently.
- Left/Right Balance: Every speaker on the left side of your MLP should have a corresponding speaker on the right side, placed at roughly the same distance and angle. This is fundamental for accurate panning and imaging.
- Even Spacing: While specific angles are guidelines, striving for relatively even spacing between your front L/R, center, and surround speakers helps create a cohesive soundstage.
- Speaker-to-Listener Distance: Aim to have all speakers roughly equidistant from your MLP. Your AV receiver's calibration will account for precise delays, but a good starting point ensures a balanced sound field.
Beyond Placement: Fine-Tuning Your Dolby Atmos Experience
Optimal speaker placement is the bedrock, but it's just the beginning. A truly stellar Dolby Atmos experience involves several other critical steps.
Acoustic Treatment: Taming Your Room for Clarity
Even with perfect speaker placement, a room with poor acoustics can undermine your efforts. Hard, reflective surfaces cause sound to bounce around excessively, leading to:
- Echoes: Sounds seem to repeat or linger unnaturally.
- Reverberation: A general muddiness or lack of clarity.
- Harshness: High frequencies can sound brittle or fatiguing.
Solutions: - Absorption: Acoustic panels on walls, bass traps in corners (especially effective for low frequencies), heavy curtains, and thick rugs can absorb sound energy, reducing reflections.
- Diffusion: Diffusers scatter sound waves, preventing harsh reflections without over-absorbing. They can make a room sound larger and more natural.
- Strategic Placement: Focus acoustic treatments on first reflection points (the spots on your walls/ceiling where sound from your speakers first bounces before reaching your ears). You can identify these with a mirror.
While a deep dive into acoustic treatment is a separate topic, understanding its importance is key to unlocking your system's full potential. It's often the missing piece for truly excellent sound. Your atmos sign guide can give you deeper insights into subtle acoustic cues and how to interpret them.
Speaker Quality Matters: Investing Wisely
The best placement in the world can't make poor speakers sound great. When choosing Dolby Atmos-enabled speakers or any speakers for your setup, consider:
- Sensitivity: How efficiently a speaker converts amplifier power into sound. Higher sensitivity means it can get louder with less power.
- Frequency Response: The range of frequencies a speaker can reproduce accurately. A wider, flatter response is generally better.
- Power Handling: How much power a speaker can safely handle from your amplifier. Match this with your AV receiver's output.
- Brand Reputation: While not exclusive, reputable brands often provide consistent quality and support.
- Timbre Matching: Ideally, all your front three (LCR) speakers should be from the same brand and series to ensure a consistent tonal quality as sounds pan across the front stage. Extending this to surrounds and even heights (if possible) provides a more seamless sound field.
The Calibration Imperative: Letting Your AV Receiver Do the Work
Once your speakers are physically in place, the most critical step is running your AV receiver's automatic room calibration system. Tools like Audyssey, Pioneer's MCACC, Denon's MultiEQ XT32, or Yamaha's YPAO are incredibly powerful.
What calibration does:
- Distance Measurement: Accurately calculates the distance of each speaker from your MLP, adjusting delays so sound arrives simultaneously.
- Level Setting: Balances the volume of each speaker to ensure a cohesive sound field.
- EQ (Equalization): Corrects for frequency response anomalies caused by your room's acoustics, trying to flatten the sound for a more neutral and accurate presentation.
- Crossover Frequencies: Determines where your subwoofer takes over from your main speakers for low frequencies, ensuring a smooth transition.
- Phase Correction: Aligns the phase of your speakers and subwoofer for tighter, more impactful bass.
Best Practices for Calibration: - Multiple Listening Positions: Most systems require measurements from multiple positions around your MLP. Follow the instructions carefully.
- Quiet Environment: Turn off all noise sources (HVAC, fans, conversations) during calibration.
- Remove Obstructions: Don't let anything block the calibration microphone.
- Review Settings: After calibration, check the settings. Sometimes a system might set a speaker to "large" when it should be "small" (meaning the subwoofer handles its bass), or set an incorrect crossover.
The Art of Experimentation: Trusting Your Ears
Even with diagrams and calibration, the final authority is your own hearing. Every room is unique, and sometimes slight deviations from the "rules" can yield better results.
- Listen Actively: Pay attention to how sound effects move, especially overhead. Does the rain sound like it's directly above, or is it too far forward/back?
- Small Tweaks: Experiment with small adjustments to speaker angles, toe-in (for front speakers), or even slight shifts in height speaker position.
- Content Variety: Listen to a variety of Dolby Atmos demos, movies, and music to assess the impact of your changes across different types of content.
- Level Adjustments: Sometimes, increasing or decreasing the level of the height channels by 1-2 dB (after calibration) can enhance their presence without making them sound unnatural.
This iterative process of listening, adjusting, and re-listening is how you truly dial in your Dolby Atmos system for optimal immersion and clarity.
Troubleshooting Common Dolby Atmos Setup Pitfalls
Even seasoned pros encounter challenges. Here are some common issues and how to approach them:
"Why Don't I Hear Height Effects?"
- Source Material: Is the content you're playing actually Dolby Atmos? Check your AV receiver's display – it should indicate "Dolby Atmos" or "Dolby TrueHD Atmos."
- Receiver Settings:
- Ensure your AV receiver is set to the correct speaker layout (e.g., 5.1.2 or 7.1.4).
- Verify that your height channels are assigned and enabled in the receiver's menu.
- Check that your receiver's sound mode is set to "Auto" or "Dolby Atmos."
- Speaker Wiring: Double-check that height speakers are wired correctly to the dedicated height terminals on your receiver.
- Up-Firing Speaker Path: If using up-firing speakers, ensure nothing is blocking the path to the ceiling, and your ceiling is reflective.
- Level Balance: After calibration, you might need to manually boost the height channel levels by 1-3 dB. They are often mixed more subtly.
"My Sound Is Muffled/Echoey"
- Room Acoustics: This is a classic sign of excessive reflections. Consider adding acoustic treatment (rugs, curtains, wall panels, bass traps).
- Speaker Placement: Are speakers too close to walls or corners, causing bass buildup or muddy reflections? Try moving them out slightly.
- Calibration Issues: Rerun your AV receiver's calibration. Ensure the microphone was placed correctly and the room was quiet.
- Toe-in: For front speakers, try angling them slightly inward (toe-in) towards your MLP to reduce side-wall reflections.
"Is My Receiver Set Up Correctly?"
- HDMI Connection: Ensure your source device (Blu-ray player, streaming box) is connected via HDMI directly to your AV receiver, and then from the receiver to your TV. Older TV optical outputs often don't support full Atmos bitrate.
- HDMI Version: Use high-speed HDMI cables (HDMI 2.0 or 2.1) that support the necessary bandwidth for Dolby Atmos.
- Firmware: Ensure your AV receiver's firmware is up to date.
- Speaker Assignments: Manually confirm in your receiver's menu that the correct speaker types (e.g., "Top Front" or "Dolby Enabled Front") are assigned to the correct physical outputs.
Your Next Steps to Sonic Nirvana: An Action Plan
Achieving truly immersive Dolby Atmos sound isn't an overnight task, but it's an incredibly rewarding journey. You now have the knowledge and visual understanding to approach your setup with confidence.
- Map Your Room: Draw a simple diagram of your listening space, noting dimensions, furniture, windows, and potential obstructions.
- Choose Your Configuration: Decide between 5.1.2, 7.1.4, or a larger setup based on your room size and budget.
- Select Height Speaker Type: Decide on overhead, up-firing, or dedicated height speakers based on your room's ceiling, aesthetics, and installation comfort.
- Preliminary Placement: Use the angles and distances discussed in this guide to place your speakers. Don't be afraid to use painter's tape to mark ideal spots on the floor and ceiling.
- Wire Everything Up: Connect your speakers to your AV receiver, ensuring correct polarity (+ and -).
- Calibrate Your System: Run your AV receiver's auto-calibration, meticulously following its instructions.
- Listen and Adjust: Play your favorite Dolby Atmos content. Pay close attention to the soundstage, the movement of effects, and the clarity. Make small, incremental adjustments to speaker positions or levels as needed.
- Consider Acoustics: If you're still not getting the sound you want, investigate basic acoustic treatment options.
Dolby Atmos has the power to transform your home entertainment. By investing the time to correctly place and fine-tune your speakers, you'll unlock a dimension of sound that brings movies, music, and games to life in ways you never thought possible. Happy listening!